Introduction
Hi there! For this tutorial, I will be using Docker to host two web servers on my local network. I’d like to note real quick that this will be a part of an ongoing project, my homelab. The hardware I will be using is a Raspberry Pi 4 that has 6GB of RAM. Another note is that this is not a complete configuration tutorial as in system hardening and network security will not be discussed but I think this would be a good start to help learn tools and techniques used in the tech industry.
Overview
This a quick step-by-step of setting up an intentionally vulnerable web server hosting two sites using Docker.
For this demonstration, I will begin the moment after updating sources and upgrading the packages on your system. I highly recommend you to take a snapshot of your system if you are using a virtual machine or creating a backup that you can restore to if your system breaks down.
This guide is assuming that you have already installed Ubuntu Server 22.04.2 LTS on your system. If you do not have Ubuntu Server installed, a useful YouTube tutorial I found is here and if you also have a Raspberry Pi 4 then I suggest watching this tutorial here or for the headless version here.
Choosing Vulnerable Web Servers
A source I found useful in finding out more about containerization is from a TryHackMe room called Intro to Containerisation which can be found here. Okay, so maybe you don’t know about Docker at this point and didn’t think it could run servers. In short, Docker is software packaged up and can run isolated without the overhead of installing another operating system on your machine. It is lightweight and contains the necessary dependencies to run an application. Since it is prepackaged software, Docker is portable and therefore there are no restrictions to its usage and it allows there to be scaling.
Since this is not a tutorial on what Docker is I know that my quick description of Docker was very short so I recommend viewing Docker’s documentation about its technology by clicking here or checking out the free TryHackMe room called Intro to Docker here where it dives deeper into Docker and also teaches you the syntax and a few common commands.
Now a quick rundown of why I chose Docker is because it is software that is containerized and therefore cannot conflict with other containers running. Another way to put it is that I didn’t want the headache of configuring multiple websites on one server or running multiple virtual machines for a simple server on each one.
Alrighty, now what exact web servers, in this case Docker images, did I decide on installing for my homelab? To answer that, I would like to say that I got a bit of my inspiration from this Github repository, and I will be installing these:
Since the hardware I am using for my homelab is a Raspberry Pi 4, the architecture needed for this tutorial required me to filter for Docker images that had ARM 64 support on Docker Hub, but feel free to still reference this post if you use a different architecture.
Installing Docker
Now I know I just talked about how this isn’t a Docker tutorial, and it really isn’t, but I will be putting down the commands I used to install Docker because I did mention that the only assumption I made for this writeup was that Ubuntu Server is installed. So I will show the commands for installing Docker itself and then get into the commands used for installing the Docker images. Now the steps are in the Docker documentation here, but if you want to follow along here are the commands.
Keep in mind that there are simpler ways to install the Docker Engine so if you’d like to check out the different options here, but this is the route that I took.
This command is to make sure that your sources list is up-to-date and to ensure the packages necessary to continue the installation of Docker:
1
2
sudo apt-get update
sudo apt-get install ca-certificates curl gnupg
These commands will allow install Docker’s official GPG (GNU Privacy Guard) key:
1
2
3
sudo install -m 0755 -d /etc/apt/keyrings
curl -fsSL https://download.docker.com/linux/ubuntu/gpg | sudo gpg --dearmor -o /etc/apt/keyrings/docker.gpg
sudo chmod a+r /etc/apt/keyrings/docker.gpg
This command will then install the Docker repository needed:
1
2
3
4
echo \
  "deb [arch="$(dpkg --print-architecture)" signed-by=/etc/apt/keyrings/docker.gpg] https://download.docker.com/linux/ubuntu \
  "$(. /etc/os-release && echo "$UBUNTU_CODENAME")" stable" | \
  sudo tee /etc/apt/sources.list.d/docker.list > /dev/null
To update the sources list again to show the Docker repository added:
1
sudo apt-get update
Then to officially install the Docker commands needed to build, compose, run, etc.:
1
sudo apt-get install docker-ce docker-ce-cli containerd.io docker-buildx-plugin docker-compose-plugin
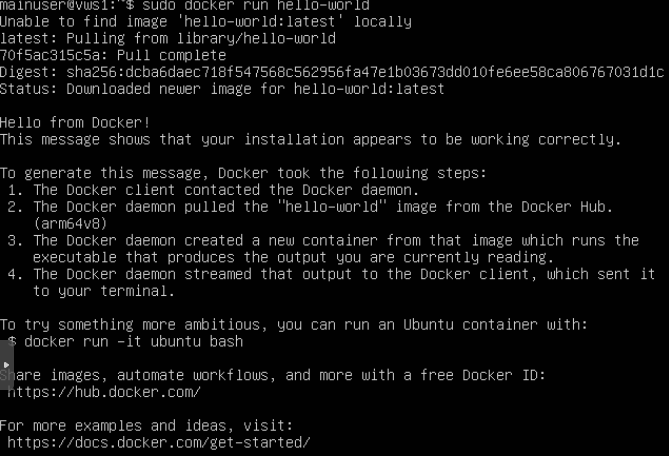
Now real quick to make sure that Docker is running how it’s supposed to, run this command:
1
sudo docker run hello-world
This command should have printed this output to your terminal:
Downloading Docker Images
Okay, so to quickly explain this part. The Docker lifecycle starts with a text document, a Dockerfile containing commands that will be used to assemble a Docker image. The Docker image will be used to act as a set of instructions to build a Docker container. Now Docker Hub found here is a library containing Docker images built from the community, and how we will be getting our web servers. So in this step, we need to download the Docker images for each web server which can be done with these commands:
OWASP Juice Shop docker image -
1
sudo docker pull bkimminich/juice-shop
OWASP WebGoat docker image -
1
sudo docker pull webgoat/webgoat
Another way, that all these commands can be executed is by using the semicolon in between commands like so:
1
sudo docker pull bkimminich/juice-shop; sudo docker pull webgoat/webgoat
Now if you would like to check and make sure that the Docker images have been pulled, you can use the command sudo docker images which should give you an output like so:

Deploying Docker Containers
Now, we are getting to what I think is the awesome part about setting up this machine and that is the building of these Docker images and deploying them as Docker containers.
Okay, so to deploy Docker containers the docker run command needs to be used and the options described here are as follows:
sudo docker run -d -p <Port_Mapping> <Docker_Image>
- -d is for detached mode which just means that the docker container will run in the background instead of the foreground.
- -p will publish the Docker container’s ports to specified host ports. In this instance, I included the IPv4 address as well to condense the command. Starting from the left, the first port is the host and the second port is the container’s port.
- For this case, bkimminich/juice-shop is the
<Docker_Image>we had previously downloaded.
OWASP Juice Shop docker image -
1
sudo docker run -d -p 192.168.4.31:3000:3000 bkimminich/juice-shop
OWASP WebGoat docker image -
1
sudo docker run -d -p 192.168.4.31:8080:8080 -p 192.168.4.31:9090:9090 -e TZ=Americas/Los_Angeles webgoat/webgoat
sudo docker run -d -p <Port_Mapping> -e TZ=<Time_Zone> <Docker_Image>
This is similar to the last command but this time the documentation for this Docker image mentions that the timezone needs to be identified and it has to be the same as the host system to match the validity for certain exercises.
- -e TZ=
<Time_Zone>In my case, the system is in America//Los_Angeles and if you want to find yours check this link here.
As shown before, another way of how the Linux commands can be executed consecutively is by using the semicolon in between commands like so:
1
sudo docker run -d -p 192.168.4.31:3000:3000 bkimminich/juice-shop; sudo docker run -d -p 192.168.4.318080:8080 -p 192.168.4.31:9090:9090 -e TZ=Americas/Los_Angeles webgoat/webgoat
And now to check to see that the Docker containers are running, you can use the command sudo docker ps and your output should look similar to mine:

If you would like to find out more about the different options that can be used with the docker run command, I suggest looking at the Docker reference linked here.
Validating the Vulnerable Web Servers
Now we already know that Docker is running and in full throttle since docker run hello-word gave us some output. So now it is time to validate that the web servers are up and running. I am going to show the three ways I have done it.
1. The first way I validated was by using netstat, a command that shows the network status and other relevant information on your system.
Since netstat isn’t installed on this Ubuntu Server version by default, we will have to install it on the system. To do so, for best practice is to run the sudo apt update to update the sources and make sure we get the latest version and then run the command sudo apt install net-tools -y. And now to check to see what connections are listening on the machine.

If your output looks similar to the image above then that means you are on the right path because it is showing that the ports we assigned for the Docker containers are listening indicating that the Docker containers are running and waiting for a connection.
2. Another way of validating could be from another device on the same network typing out in the terminal:
If you happen to be on another machine that is Windows then typing out this PowerShell command and executing it will let you know if the web server is live, either showing a success or failure:
1
Test-NetConnection -ComputerName <IP_Address> -Port <Port_Number>
And if you happen to be on another machine that is Unix-based, you can use the netcat package:
1
nc -zv <IP_Address> <Port_Number>
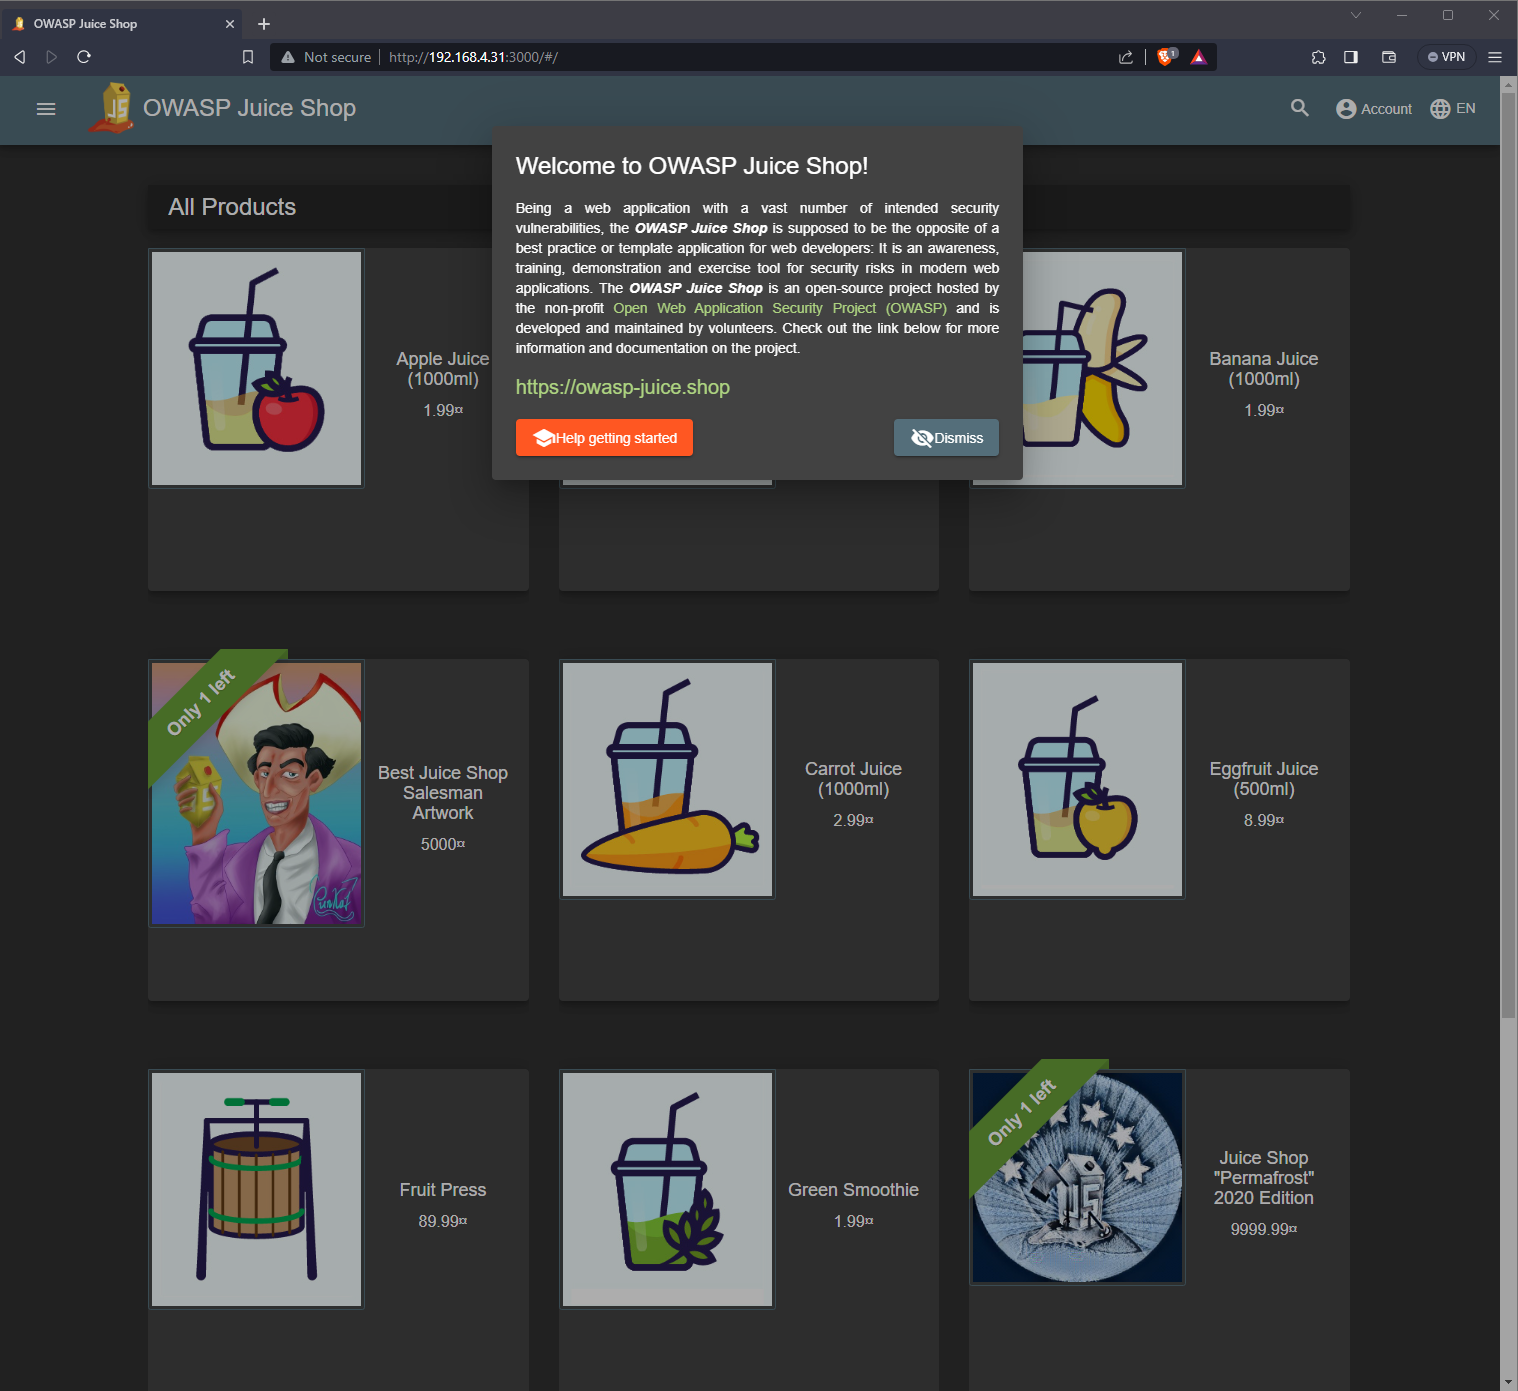
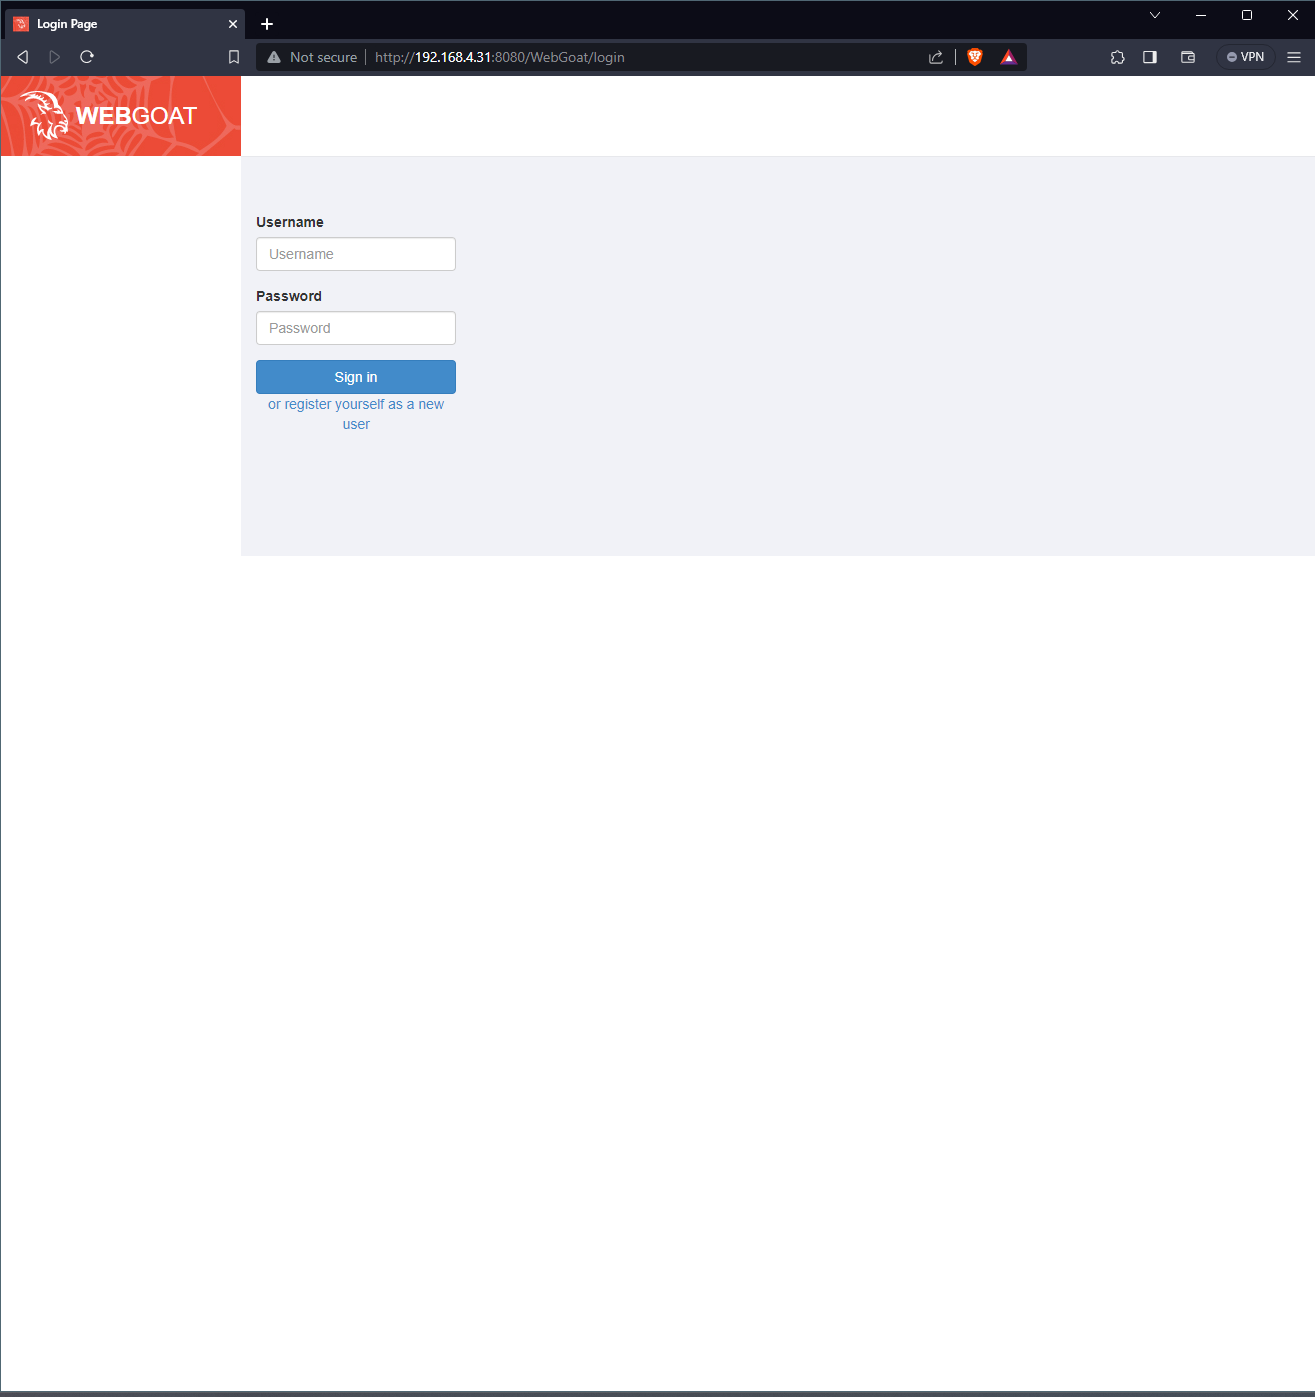
3. Now the last method I would like to validate that the Docker containers are up and running is by checking the websites themselves since that is what we wanted in the first place:
For the OWASP Juice Shop container, I entered into my browser http://192.168.4.31:3000 which showed me this:
For the WebGoat container, I entered into my browser http://192.168.4.31:8080 which showed me this:
As we have noted from the three different validation techniques, the Docker containers are up and running which means that you are now free to practice your vulnerability testing skills!
Conclusion
And now we have reached the end of the tutorial. I hope this was helpful for you with implementing your own lab environment or whatever the case might be. This was just a tiny scratch on the surface when it comes to containerization software like Docker and I have a lot to learn. With that being said, I think I have gained a bit of curiosity to learn more about the capabilities of Docker and will be posting about other projects that use its technology. For now, congratulate yourself for learning a bit of the basic Docker commands, and possibly even learning about other Linux-related information such as the netcat package.